



Contents
🎥. Instructional Video
01. Foreword
02. Before First Use
03. Pedal Installation
04. Resistance Adjustment
05. Synchronization with GPS or Watch
06. Provided Data
07. Removal and Bike Change
08. Platform Change (COMBO)
09. Battery Charging and Management
10. Maintenance
11. Component List
12. Technical Specifications
13. Warnings
14. Contact Us
FAQ

In a hurry?
Watch the video version of this guide!
All you need to know in under 5 minutes.
01. Foreword
A. Acknowledgements
The entire SportOptim team thanks you for choosing our CyclOptim pedals to track your performance! By choosing our products, you're supporting a young Bordeaux-based company committed to working with local partners — not only for environmental reasons (cutting unnecessary logistics miles) but also to promote French industrial expertise.
This manual provides everything you need to get the most out of your CyclOptim experience! We chose to offer a digital manual so it can be easily updated and enriched with your questions and feedback as needed.
Welcome to the front of the peloton — enjoy your power meters, push your performance, and most importantly, have fun riding!
B. Warning
Before fitting and using your CyclOptim pedals, please read this user manual carefully, along with the safety and maintenance instructions. Improper use or installation could lead to accidents or damage your pedals.
If you're new to cycling, don't hesitate to contact your local bike mechanic or bike shop for help with the installation. Damage resulting from improper installation is not covered by the warranty.

This product complies with current European regulations
C. Box contents
MACADAM Lite
- 2 ROAD platforms (Keo® or SPD-SL® depending on the model).
- 1 left connected spindle and 1 conventional right spindle.
- 1 USB charging cable.
- 2 washers.
- A quick start guide.
MACADAM Classic
- 2 ROAD platforms (Keo® or SPD-SL® depending on the model).
- 2 connected spindles.
- 2 USB charging cables.
- 2 washers.
- A quick start guide.
MASSIF Lite
- 2 MTB SPD® platforms.
- 1 connected left spindle and 1 conventional right spindle.
- 1 USB charging cable.
- 2 washers.
- A quick start guide.
MASSIF Classic
- 2 MTB SPD® platforms.
- 2 connected axles.
- 2 USB charging cables.
- 2 washers.
- A quick start guide.
Classic
- 2 SPD® MTB platforms.
- 2 ROAD platforms (Keo® or SPD-SL® depending on the model).
- 2 connected spindles.
- 2 USB charging cables.
- 2 washers.
- A quick start guide.
Ultra
- 2 SPD® MTB platforms.
- 2 ROAD platforms (Keo® or SPD-SL® depending on the model).
- 2 pairs of connected spindles (i.e. 4 connected spindles - ⚠️ They nevertheless function as a pair).
- 2 USB charging cables.
- 4 washers.
- A quick start guide.
D. Required tools
To install / remove your pedals you will need:
- A 15mm flat spanner
- A 2.5mm Allen key
E. Installation of cleats on shoes
Warning: SportOptim does not supply cleats with its products, but offers KEO®, SPD-SL®, and SPD® cleats for purchase. To avoid damage or injury, only use cleats sold by SportOptim or genuine cleats from these brands. SportOptim cannot be held liable for any damage or injury resulting from the use of cleats not intended for CyclOptim pedals.
CyclOptim pedals are not designed for use with flat shoes. Always use cycling shoes fitted with the appropriate cleats to avoid damage to the platforms or the sensor.
If you purchased cleats from our website along with your CyclOptim pedals, you will find them in a small kraft envelope, complete with their mounting screws.
💡 Tip: If you are replacing your existing cleats with ours, take a moment to trace around your current cleats onto the sole of your shoes with a marker or pencil. This will let you position your new cleats in exactly the same spot without having to readjust from scratch.
Remove your current cleats, check the sole is clean, then fit the new cleats in the marked position.
Place the cleat, then fit the backing plates and screws. Tighten carefully, making sure the cleat doesn't move during the process. We recommend a torque of 4–6 Nm.
If these are the first cleats you are installing on your shoes:
Stick a strip of easily removable tape along the sole on the inner edge of your foot, starting from the base of your big toe. Put your shoes on and mark the position of the first metatarsal head — the bony prominence at the base of your big toe — onto the tape.
Remove your shoes and position the cleats over the mounting holes, then fit the backing plates and screws. Tighten just enough to hold the cleat in place without fixing it permanently.
Align the centre mark on the cleat with the mark you made on the tape, then tighten fully — taking care not to let the cleat shift during the process. We recommend a torque of 4–6 Nm.

Before heading out, check that the cleat position feels right and adjust if needed. Loosen the screws, reposition, and tighten back up.
02. Before First Use
Before first use, charge your pedals using the provided cables. You can connect them via USB to your computer or use your mobile phone's charger.
The charging cables attach magnetically to the end of the spindles. Make sure to align the charger connectors with those on the spindle.
The charger LED indicates charging status:
- Blue LED solid: your charger is ready.
- Green LED flashing: your pedals are charging.
- Green LED solid: your pedals are fully charged.
For more information on charging and battery management, see Section 10 – Charging and Battery Management.

03. Pedal installation
- Step 1: Clean the pedal tightening thread on your bike crank.
- Step 2: Insert the first pedal's axle into the crank. It's important to be able to screw the pedal in completely by hand, and only use the wrench for final tightening.
Note: The axles are pre-greased, so there's no need to add grease during the initial installation. If you remove your pedals to transfer them to another bike or for storage, we recommend light greasing before the next installation.
- Step 3: Tighten the axle using a 15mm open-end wrench. When facing your pedal, the tightening motion is counter-clockwise for the left pedal and clockwise for the right pedal.
We recommend a tightening torque between 35 and 40 Nm. However, if your crank manufacturer recommends a lower tightening torque, use their recommended values.
Warning: If your crank tightening thread is recessed compared to the crank body, it is necessary to use the washers provided to avoid any friction damage to your cranks.

- Step 4: Repeat for the second pedal.
- Step 5: Once both pedals are installed, turn the cranks through a full rotation to check for any obstruction.
04. Release Tension Adjustment
With your pedals installed, get on your bike and test clipping in and out a few times to check that the release tension suits you.
If it feels too stiff or too light, you can adjust it directly on the pedal:
- Using a 2.5mm Allen key, adjust the screw located at the rear of the Macadam pedal.
- Using a 2.5mm Allen key, adjust the screw located on the top rear of the Massif pedal. The Massif can be clipped into on both sides — make sure to balance the release tension on each side to avoid any nasty surprises.
To increase the tension, turn the screw clockwise. To decrease it, turn it counter-clockwise.
Adjust both pedals to your preference.
Caution: If the screw becomes hard to turn, you've reached the maximum or minimum of its range — do not force it further, as this may damage your pedals.
This adjustment affects both comfort and safety. Take the time to find your ideal setting.


05. Synchronisation with your GPS Cycling Computer or Watch
Your pedals are now installed and set up. It's time to sync your GPS computer or smartwatch with your sensors.
NB: The current firmware on your CyclOptim pedals only uses the ANT+ protocol. You can therefore synchronise your sensors with any compatible GPS cycling computer or smartwatch that supports this protocol. A list of compatible devices is available here.
A. Synchronization
As the pairing process varies by manufacturer, we recommend consulting the manual for your GPS cycling computer or smartwatch. A few tips for a smooth pairing:
- Make sure your GPS computer or smartwatch is within 2 metres of your pedals.
- Make sure you are not surrounded by too many other sensors. If needed, move at least ten metres away from teammates or competitors before pairing.
- Make sure your sensors are charged and turn the cranks a few times to wake them from sleep mode.
- From your GPS computer or smartwatch, run a scan to search for and pair a new accessory.
- The ID code for your CyclOptim pedals corresponds to the last 4 digits of the serial number on your left spindle.
- Your device will confirm that your sensors have been successfully paired.
NB: Communication between your GPS computer or smartwatch and your pedals occurs via the left pedal only, regardless of the model you are using (Lite or Classic).
B. Configuration
Once paired, a few configuration steps are required to ensure your sensor data is accurate and reliable. This configuration is essential for consistent power measurement.
You will need to repeat these steps each time you switch bikes. We also recommend performing a manual zero-offset regularly — even if your pedals have not been removed — to ensure data consistency.
1- Crank length

From your GPS computer or smartwatch menus, you will need to enter the crank length (refer to your device's manual to locate this setting).
The crank length is most often engraved or stamped directly on the back of the crank arm. If you cannot find the value there, we recommend checking the manufacturer's website. Alternatively, you can measure it yourself, though this method is less precise. The measurement is taken between the centre of the bottom bracket axle hole and the centre of the pedal axle hole, and is expressed in millimetres.
Entering the correct crank length is critical, as it directly affects the power calculation performed by the pedals. For the most accurate power data possible, make sure the crank length set in your bike computer is correct and has not been reset by your device.
2 - Zero-offset
The zero-offset sets the baseline reference for your sensors.
For CyclOptim pedals, this involves storing two reference values: zero power output, and the bottom dead centre position for the gyroscopes.

Step 1: Place your bike upright on a flat surface.
Step 2: Position your right pedal at the bottom of the stroke, with the crank arm perpendicular to the ground. If you are in the saddle, unclip your shoes from the pedal.
Step 3: From your GPS computer or smartwatch, initiate a calibration — sometimes referred to as a zero reset or zero-offset. (Refer to your device's manual to locate this setting.) Wait for confirmation from your device. Your sensors are now correctly configured.
Once calibration is complete, your GPS computer or smartwatch will return a confirmation value if successful. This number represents the offset value of your left spindle relative to the crank arm. If you repeat the calibration multiple times on the same bike without removing and reinstalling your pedals, this value should remain consistent.
If the calibration was unsuccessful, your device may return an error code. Refer to the table below to complete the calibration successfully.
Error code
Possible reason
Corrective actions
1 or -1
GPS communication error with the master pedal, the left pedal.
- Check that your left axle is properly awake. It may have gone to sleep during operations on your GPS/Watch.
- Also try putting it on charge: the battery may be completely drained.
2
The left pedal battery is too low to perform calibration.
- Charge the left axle for a few minutes: the level will be sufficient to start calibration and ride for several hours.
3
The right pedal battery is too low to perform calibration.
- Charge the right axle for a few minutes in order to perform calibration.
4
The master axle (left) received no response from the slave 15 seconds after its calibration.
- Check that the slave has not gone to sleep when calibration was launched. Spin the pedals to wake it up.
- Put the pedal on charge for a few minutes then restart calibration.
06. The data provided
Your CyclOptim sensors transmit the following data to your GPS/watch:
- Power (in Watts). Power is the amount of energy one system supplies to another over a given time. The more energy a cyclist can sustain over a given period, the faster they will ride.
[On Lite models, the reported power is the left leg power multiplied by two.] - Cadence (in RPM – revolutions per minute). The number of crank revolutions you complete per minute.
- Left/right leg balance (percentage split). The power distribution between both legs, displayed as a percentage. For example, riding at 200 Watts with a 58%–42% split means your left leg is producing 116 Watts and your right leg 84 Watts. This helps you identify a significant imbalance or abnormal compensation.
[This metric is only available on Classic models; Lite models only provide left leg data.]
07. Disassembly and bicycle change
Removing your CyclOptim pedals follows the same process as any other pedal. Loosen the axle using a 15 mm flat spanner. When facing the pedal, turn clockwise to loosen the left pedal and anti-clockwise for the right.
If you used them, remember to retrieve the washers.
When reinstalling — whether on the same bike or a different one — we recommend applying a very thin layer of grease to the axle threads and the crank thread. A standard all-purpose grease will do the job.
Remember to re-zero your pedals once reinstalled (see section 05. Synchronisation with your GPS or watch).
08. Platform change (COMBO Pack) / Removal of spindles

NB: If you own a version prior to 2026, please refer to the following video:
https://www.youtube.com/watch?v=0vYYceBUN2M
09. Charging and Battery Management
A. Charging
Your CyclOptim pedals have a battery life of approximately 25 hours. There is no need to remove your pedals for charging, as the connector is accessible from the back of the crank. To charge your sensors, use the provided cables, which you can connect via USB to your computer, car, or power bank. You can also use your phone's mains adapter.
Note: If your phone uses a fast charger, you can use it safely — charging will not be faster than with a standard charger, as fast charging is not supported by your sensors' batteries.
The charging cables connect magnetically to the end of your spindles. Ensure the charger connectors are aligned face-to-face with the spindle connectors.
If you don't remove your CyclOptim pedals, the connector position will always be the same. To make this easier, take a moment to note their position — you'll be able to connect your charger first time, every time.
The charger LEDs indicate charging status:
- Blue LED: the cable is properly connected to a power source.
- Flashing green LED: your sensors are charging.
- Solid green LED: charging complete.
It takes just under 3 hours to fully charge your sensors using a standard 5V charger.
If the green LED flashes very rapidly when you connect your pedal, and your GPS or watch fails to connect once unplugged, this may indicate a battery fault. If so, please contact CyclOptim support and we'll help you from there.
NB: Even if you're not using your pedals, we still recommend charging them at least once every three months. This is because batteries naturally discharge very slowly over time, even when not in use. To prevent the voltage from dropping too low, we recommend that occasional users recharge their axles periodically to maintain good battery health.
Your GPS or watch will notify you when your sensors' battery is low — at approximately 25% charge remaining, giving you around 4.5 hours of battery life. A critical battery warning is triggered at around 10%, corresponding to approximately 2 hours of riding left. At this point, recalibration will not be possible until the pedals have been sufficiently recharged.

Warning: before charging, wipe the sensor connectors with a clean, dry cloth!
Avoid moving your pedals during charging, as this risks damaging the connectors and cables.
💡 A handy extra tip!
Your chargers use a magnetic connection. Depending on how clean your pedals and charger are, the magnet may not hold as strongly. Poor magnetic contact can reduce charging efficiency if the cable shifts out of alignment — that is, with the connectors no longer facing each other properly. To avoid any issues, feel free to use parts of your bike to support the cable weight (bottle cage, drivetrain, spokes, etc.) and keep the connection secure throughout charging.
10. Maintenance
To maintain your CyclOptim pedals, do not use abrasive products.
When cleaning your bike, a simple rinse should be sufficient in most cases. Avoid aiming a high-pressure jet of water directly at your pedals to avoid any damage.
Remember to thoroughly dry your pedals after cleaning or a wet ride — especially before charging, and particularly around the connectors. Use a clean, dry cloth.
For stubborn mud or dirt, a little diluted black soap in lukewarm water applied with a soft sponge works well and is an eco-friendly option for outdoor use.
Warning: Your pedals are splash-resistant, but are not designed for prolonged immersion — whether during cleaning or riding.
11. Your pedal's components
Macadam (Lite or Classic)

Massif (Lite or Classic)
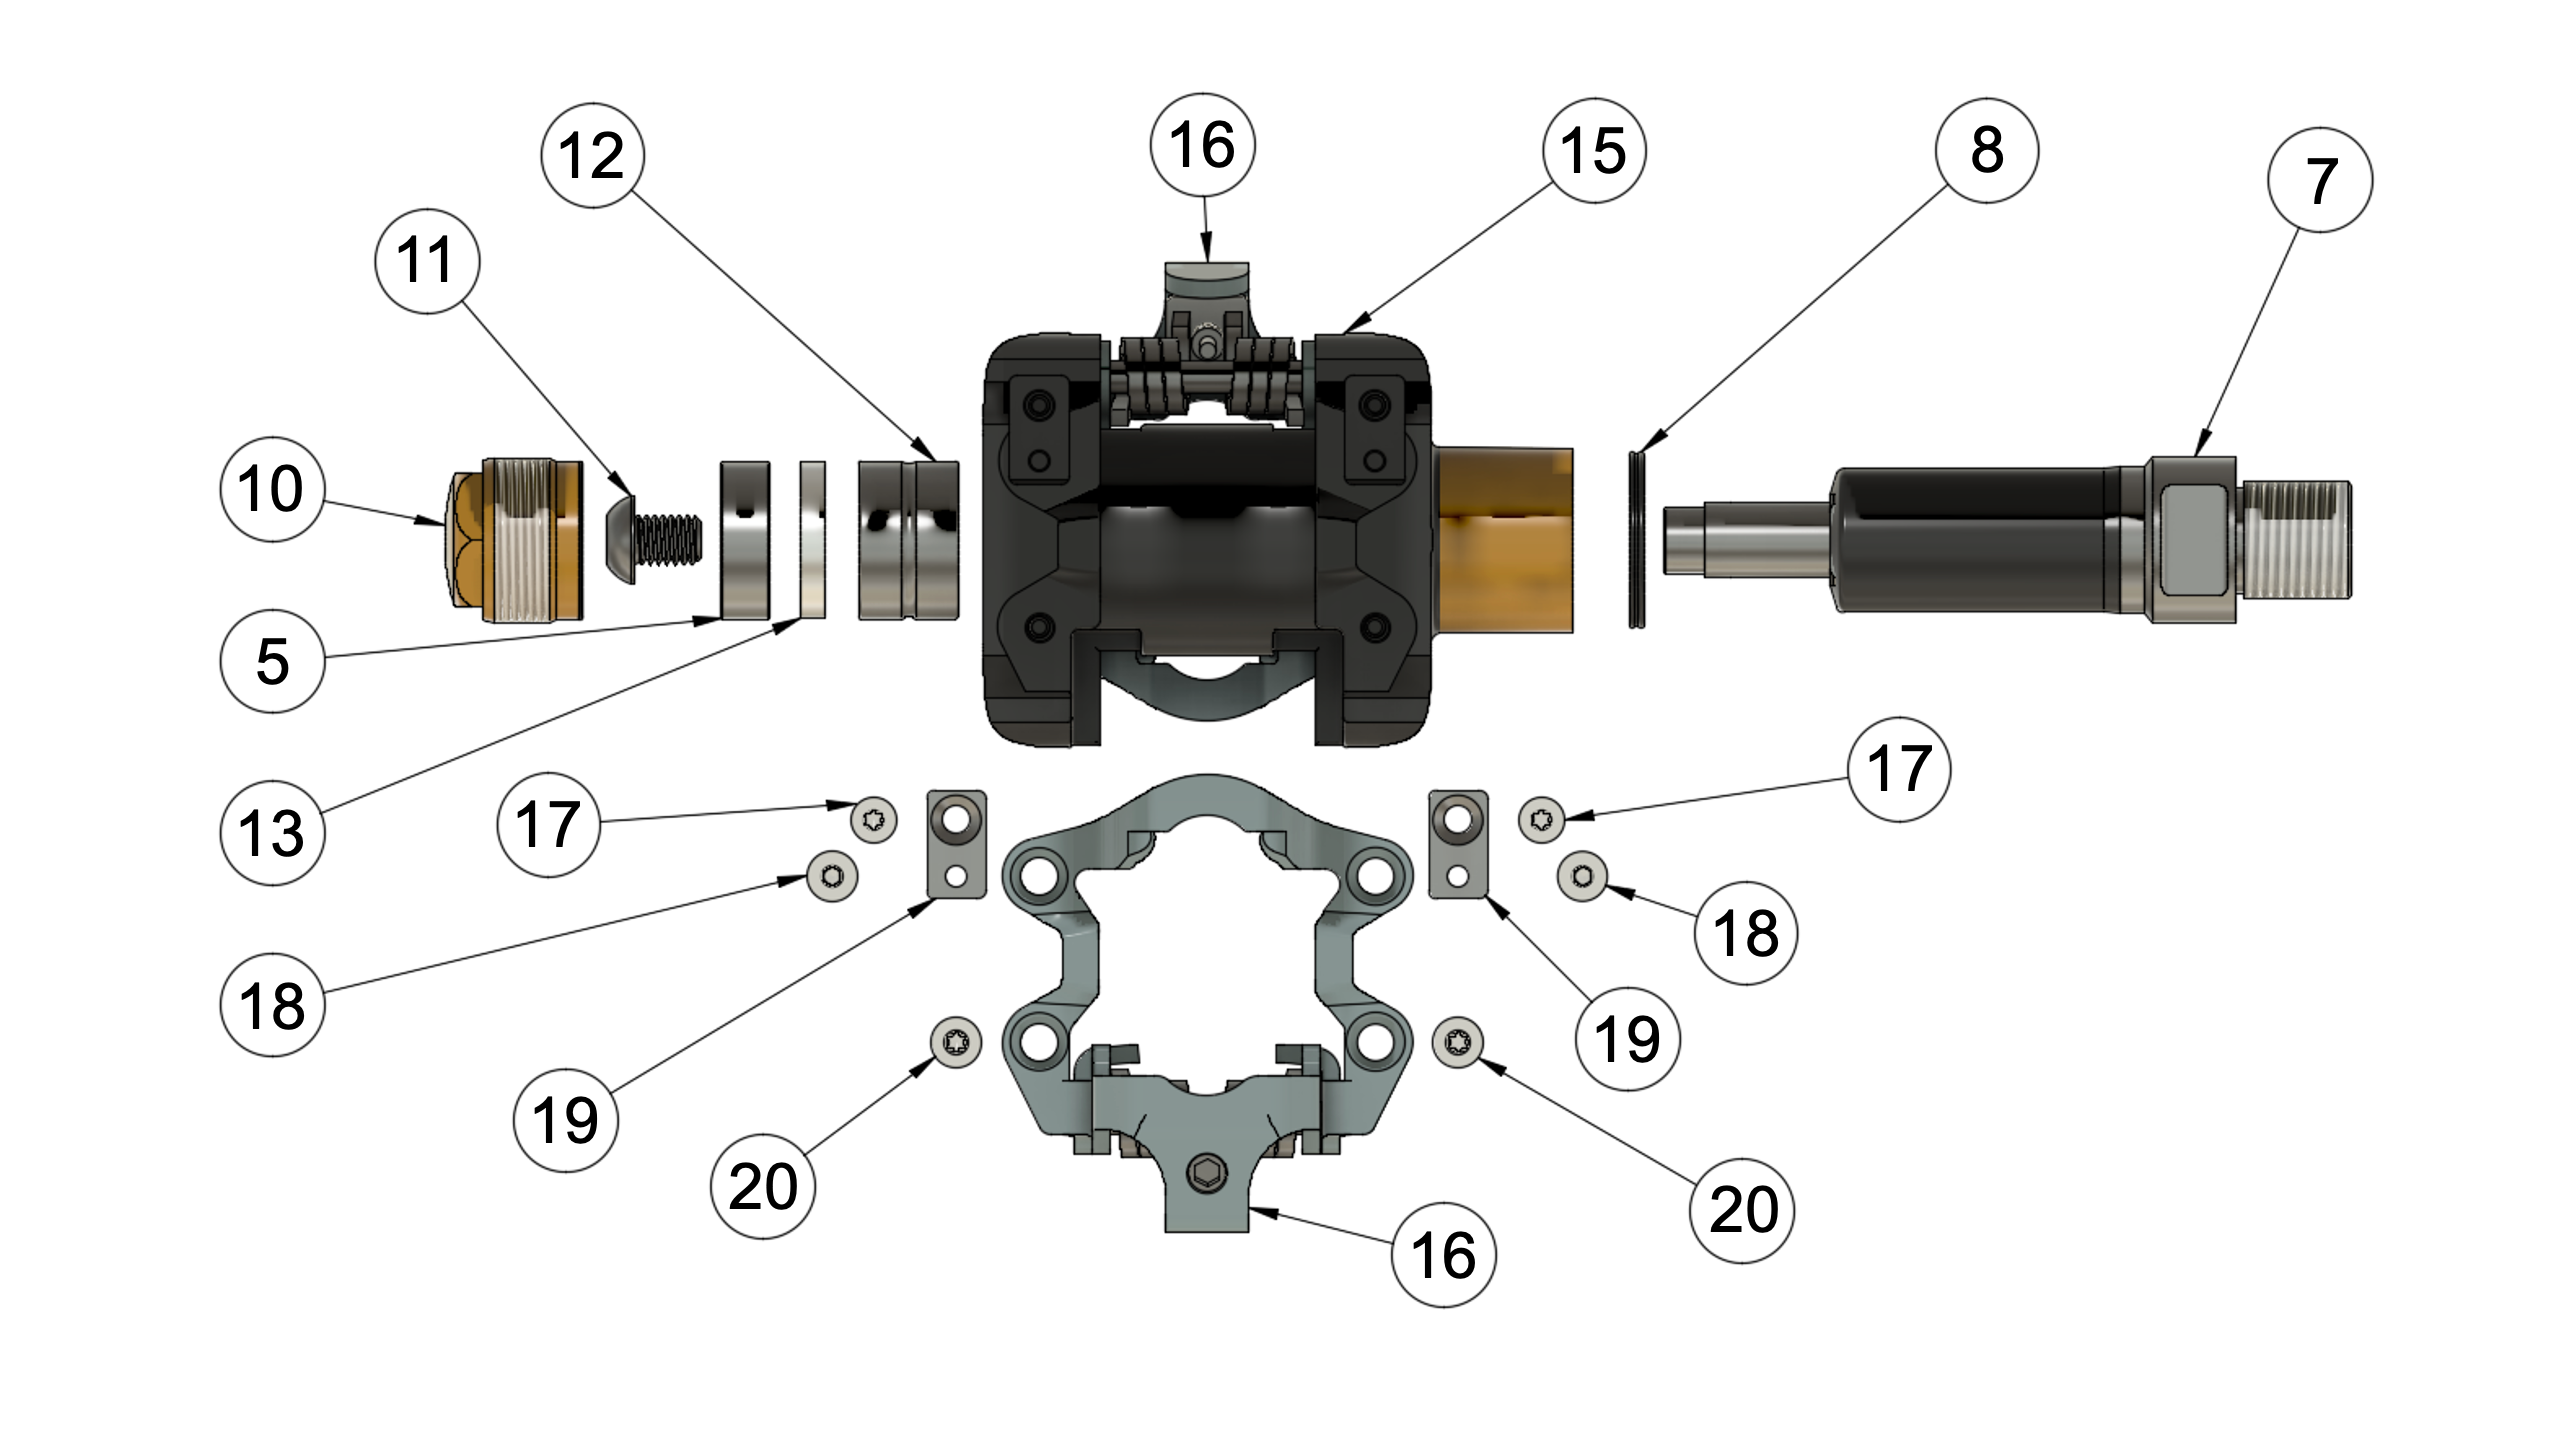
| Pedal components | ||
|---|---|---|
| Part number | Element | Reference - Description |
| 1 | Road springs | Refs M241 and M242 |
| 2 | Tension adjustment screw | Ref V7 |
| 3 | Tension adjustment nut | Ref V8 |
| 5 | Ball bearing | Ref R2 |
| 6 | Rear closure clamping screw | Ref V6 (x2) |
| 7 | Sensor axle | Ref M1G/D |
| 8 | Seal | Ref J1 |
| 9 | Spring and rear closure axle | Ref M25 |
| 10 | Closure cap | Refs M51, M52, J2 and J3 |
| 11 | Axle screw | Ref V1 |
| 12 | Needle bearing | Ref R1 |
| 13 | Spacer | Ref M4 |
| 14 | Rear closure | Macadam Keo® - Ref M211 Macadam SPD-SL® - Ref M221 |
| 15 | Platforms | Macadam Keo® - Ref M21G/D Macadam SPD-SL® - Ref M22G/D Massif SPD® - Ref M3G/D |
| 16 | SPD® cage (x2) | Cage_Spd v1 |
| 17 | FHC screw | FHC screw M3x5 v2 |
| 18 | Thermo screw | Thermoplastic screw ∅3x8 v2 |
| 19 | SPD® cage mounting bracket | Support_fixation_cage V1 |
| 20 | Thermo screw | Thermoplastic screw ∅3x6 v2 |
12. Technical Specifications
| Product reference: | Lite versions: sensors in the left pedal only. Classic versions: sensors in both pedals. |
| Functions: | Transmission of: Power (in Watts), accuracy ± 1% Cadence (in revolutions per minute (rpm)) 30 – 200 rpm Left / Right balance (Macadam Classic version only, as a percentage). |
| Use: | Indoors and outdoors. |
| Stack height (h-stack): | 12.5 mm for Macadam, 13.3 mm for Massif |
| Q-factor: | 53 mm |
| Pedal dimensions: | Height: 40 mm Width: 115 mm Length: 90 mm |
| Maximum cyclist weight: | 120 kg |
| Pedal weight (pair): | Macadam Classic version: 360 g Macadam Lite version: 345 g Massif Classic version: 425 g Massif version: 440 g |
| Radio protocol: | ANT+, PWR profile Radio frequency: 2457 MHz Radio power: +4 dBm maximum |
| Internal battery: | Internal rechargeable Li-Po, nominal voltage 3.7 V dc |
| Battery life in use: | 25h |
| Standby battery life: | 4 months |
| Deep standby battery life: | More than 8 months |
| Battery charging: | Charger supply 5 V dc, 100 mA Charging time 2h from fully discharged |
| Water and dust protection: | IPX7 (Before charging the pedals, clean the connectors thoroughly and keep the pedals and charging cables dry) |
| Warranty: | 2 years |
| Operating temperature: | -10°C to +50°C in use +10°C to +50°C while charging |
| Operating altitude: | 2,000 m maximum |
13. Warnings
HEALTH
Before engaging in a sport or starting a new training programme, consult your doctor to assess your health.
CyclOptim pedals are not a medical device; whilst power is a useful metric for tracking your fitness, our sensors are not intended for healthcare purposes.
ROAD SAFETY
For your safety and the safety of all road users, always ensure you comply with the Highway Code and carry the required equipment when cycling on public roads.
ELECTRONICS
As with any electronic device fitted with a lithium-ion battery, do not expose your pedals to intense heat (e.g., a car parked in direct sunlight in summer), and keep them away from fire and explosive environments. Batteries must not be dismantled, replaced, modified, or punctured under any circumstances.
CHOKING HAZARD
Please note that CyclOptim pedals contain small parts that may be swallowed by children. If ingestion is suspected, contact a doctor or emergency services immediately.
RECYCLING
Your pedals are recyclable — remember to drop them off at a dedicated recycling point so the electronics can be properly processed and recovered. Plastic components can go in your regular plastic recycling bin.

The pedals and their packaging must each be disposed of through the appropriate recycling channels. Do not discard any components with household waste.
In accordance with European Directives 2012/19/EU and 2006/66/EC, electrical equipment that is no longer functional, along with used or defective batteries and accumulators, must be kept separate and directed to the appropriate recycling channels.
14. Contact Us
For any questions, feel free to reach us at: contact@cycloptim.fr
You can also write to us at: SPORTOPTIM, 18 rue Jeanne Lanvin, 33100 Bordeaux : www.cycloptim.fr
Frequently Asked Questions (FAQ)
How do I turn my pedals on/off?
When charged, your pedals power on automatically as soon as they detect movement.
Similarly, they will enter standby mode after a period of inactivity.
How do I find my serial numbers?
You can find your serial numbers on your pedal packaging and on your invoice.